
TABLE OF CONTENTS
- Overview
- Prerequisites
- Create a Vault Access Token
- Connecting the integration in First AML
- Understanding how your offices are connected
- How it works
- Important process note
Overview
Our Vault integration is simple to set up and lets you search for a Vault property from within First AML when creating a case. Property and contact details flow through automatically, which means less manual data entry, fewer errors, faster onboarding, and a smoother AML process that keeps Vault's AML records in sync.
Prerequisites
To set up the integration, you will need:
To be a First AML Compliance Admin.
Credentials for a Vault administrator with permissions to create Third-Party Access Tokens.
For everyday use of the integration, users need a First AML account for creating cases. We call this a Frontline account: it lets a user create and work cases day to day, without the admin permissions needed to configure the integration itself.
Create a Vault Access Token
Create a Vault Access Token to allow First AML to retrieve properties and contacts from your Vault account.
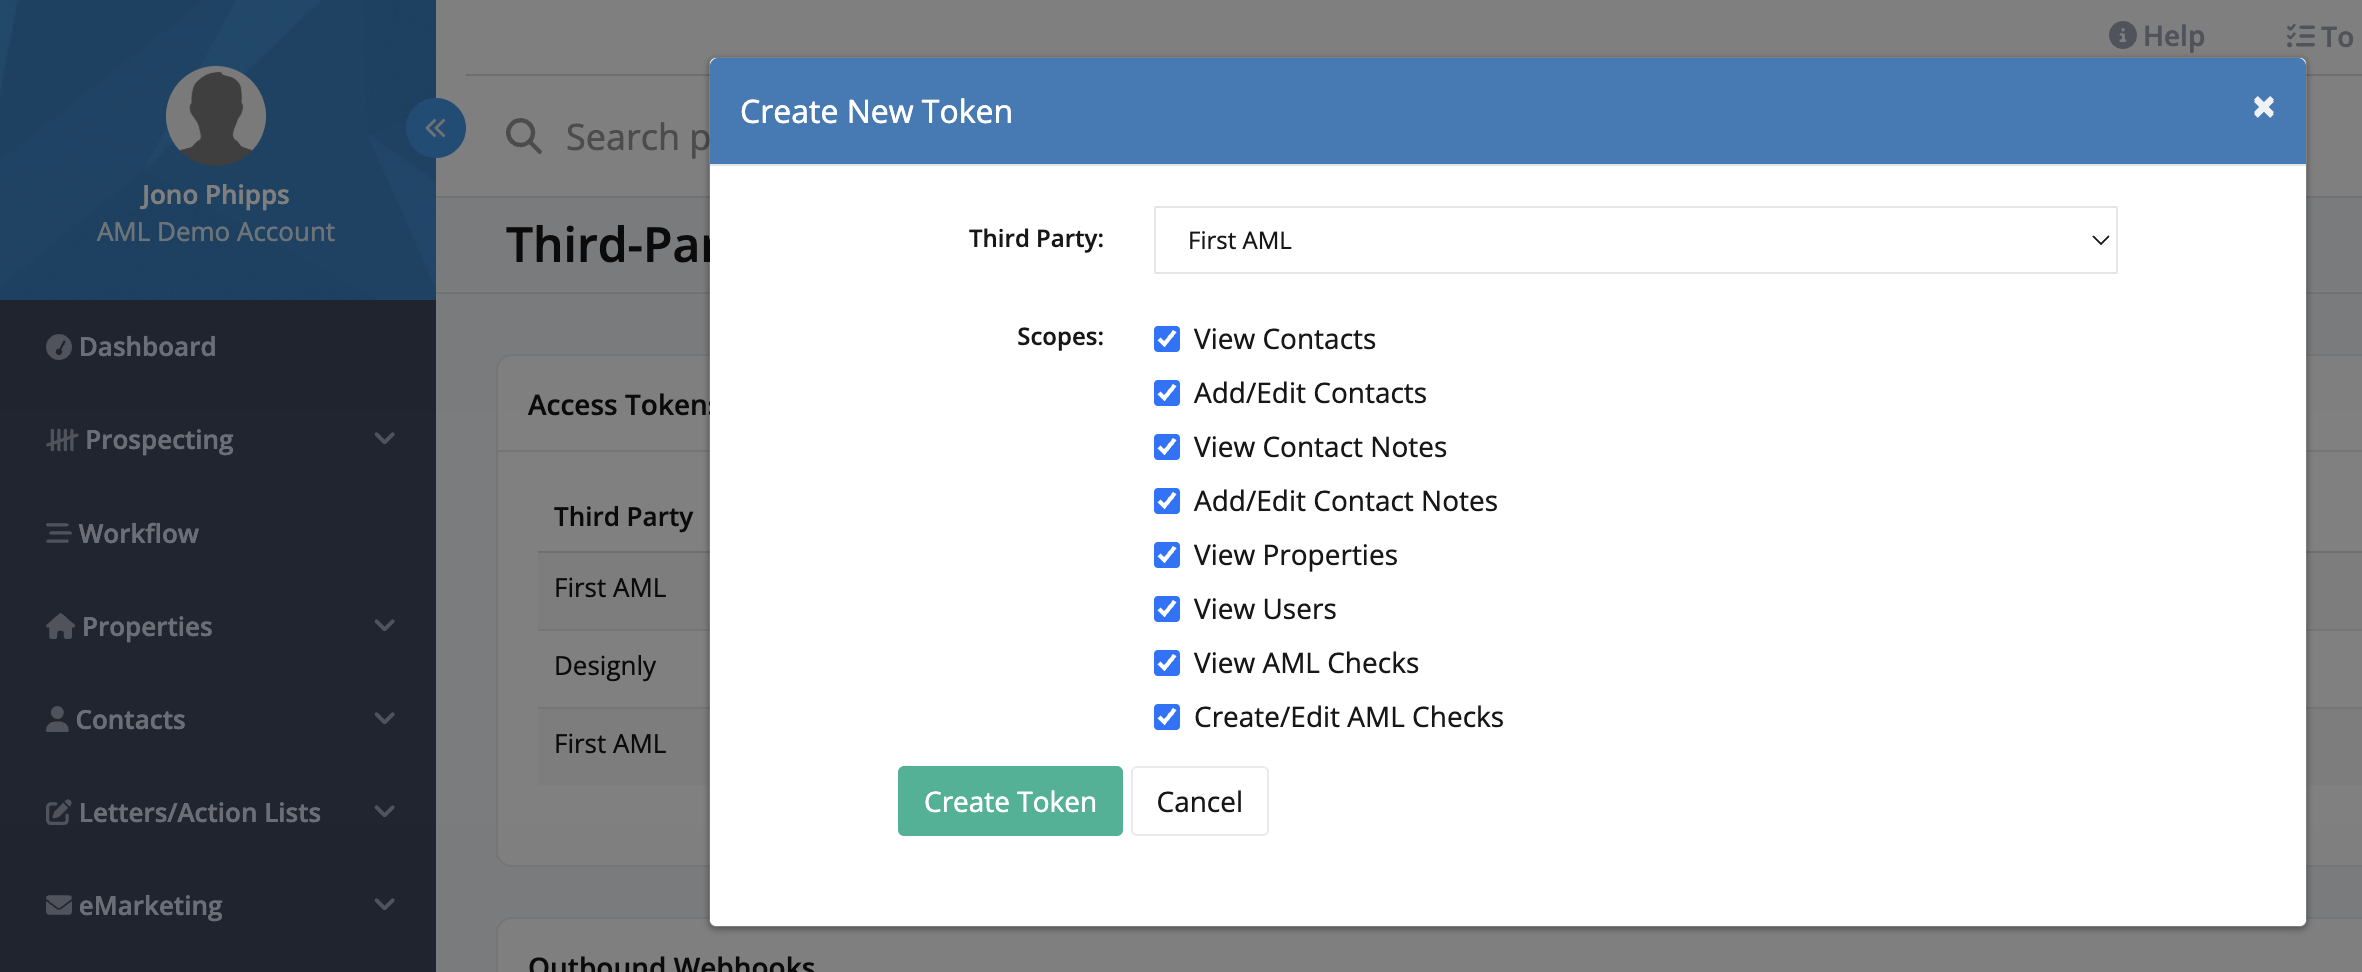
As a Vault administrator, navigate to "Office Integrations" > "Third-Party Access".
Select "Add Token" to create a new token.
In the "Third Party" drop-down, select "First AML".
Ensure all scopes are selected.
Copy the First AML token.
Connecting the integration in First AML
If you do not have offices configured
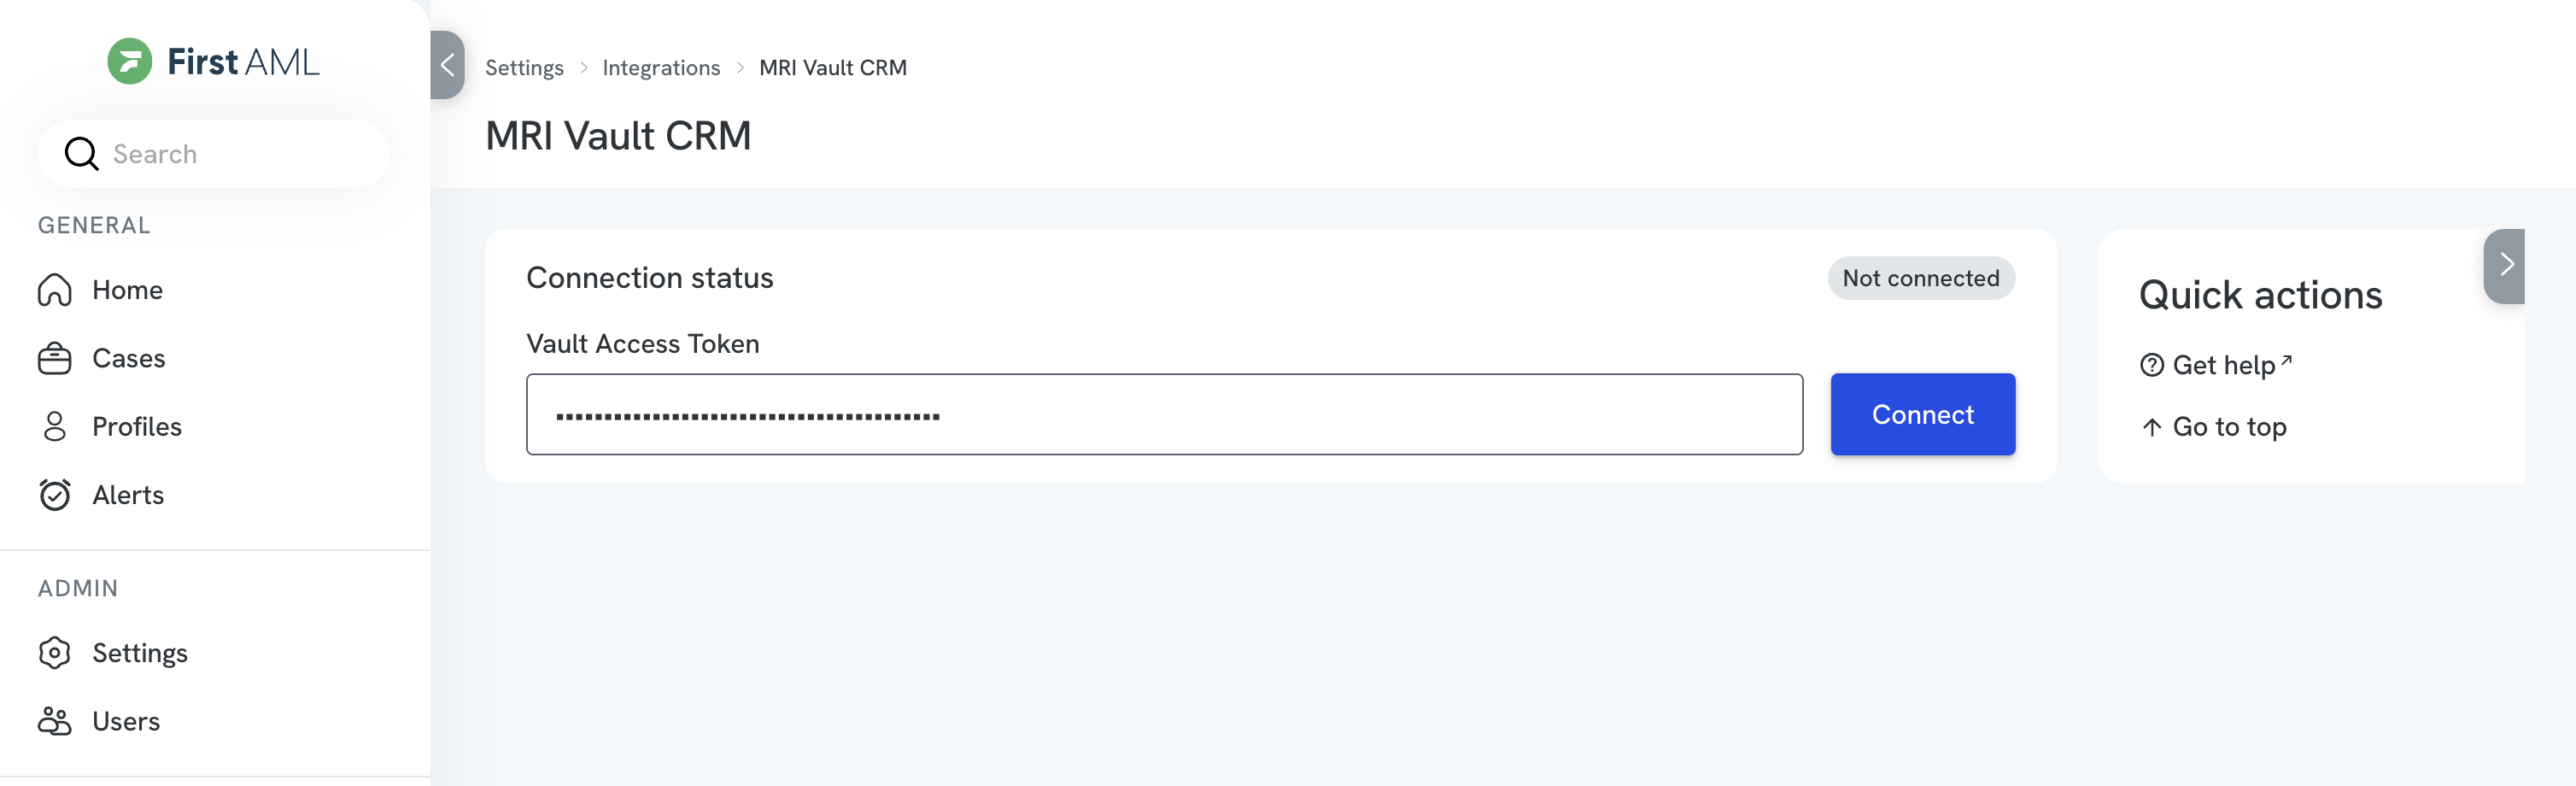
- As a Compliance Admin in First AML, select "Settings" in the left-side menu, then go to "Integrations" > "Vault" > "Connect".
- Paste in the Vault Access Token you just created and select "Connect".
If you have multiple offices
If you have multiple offices, how you connect to Vault depends on what your offices represent and whether they should share the same Vault account. In First AML, an office is the access-scoping unit that determines which users can see a case, so this choice affects who in your firm can use each Vault connection.
1. If you have multiple offices sharing the same Vault account
If you have multiple First AML offices sharing the same Vault account, our "Shared integration" lets you connect your Vault account once and enable that connection for multiple offices, without setting up each office individually.
- Create your Vault Access Token in the Vault account that should be shared, following the instructions above.
- As a Compliance Admin, select "Settings" in the left-side menu, then go to "Integrations" > "Vault".
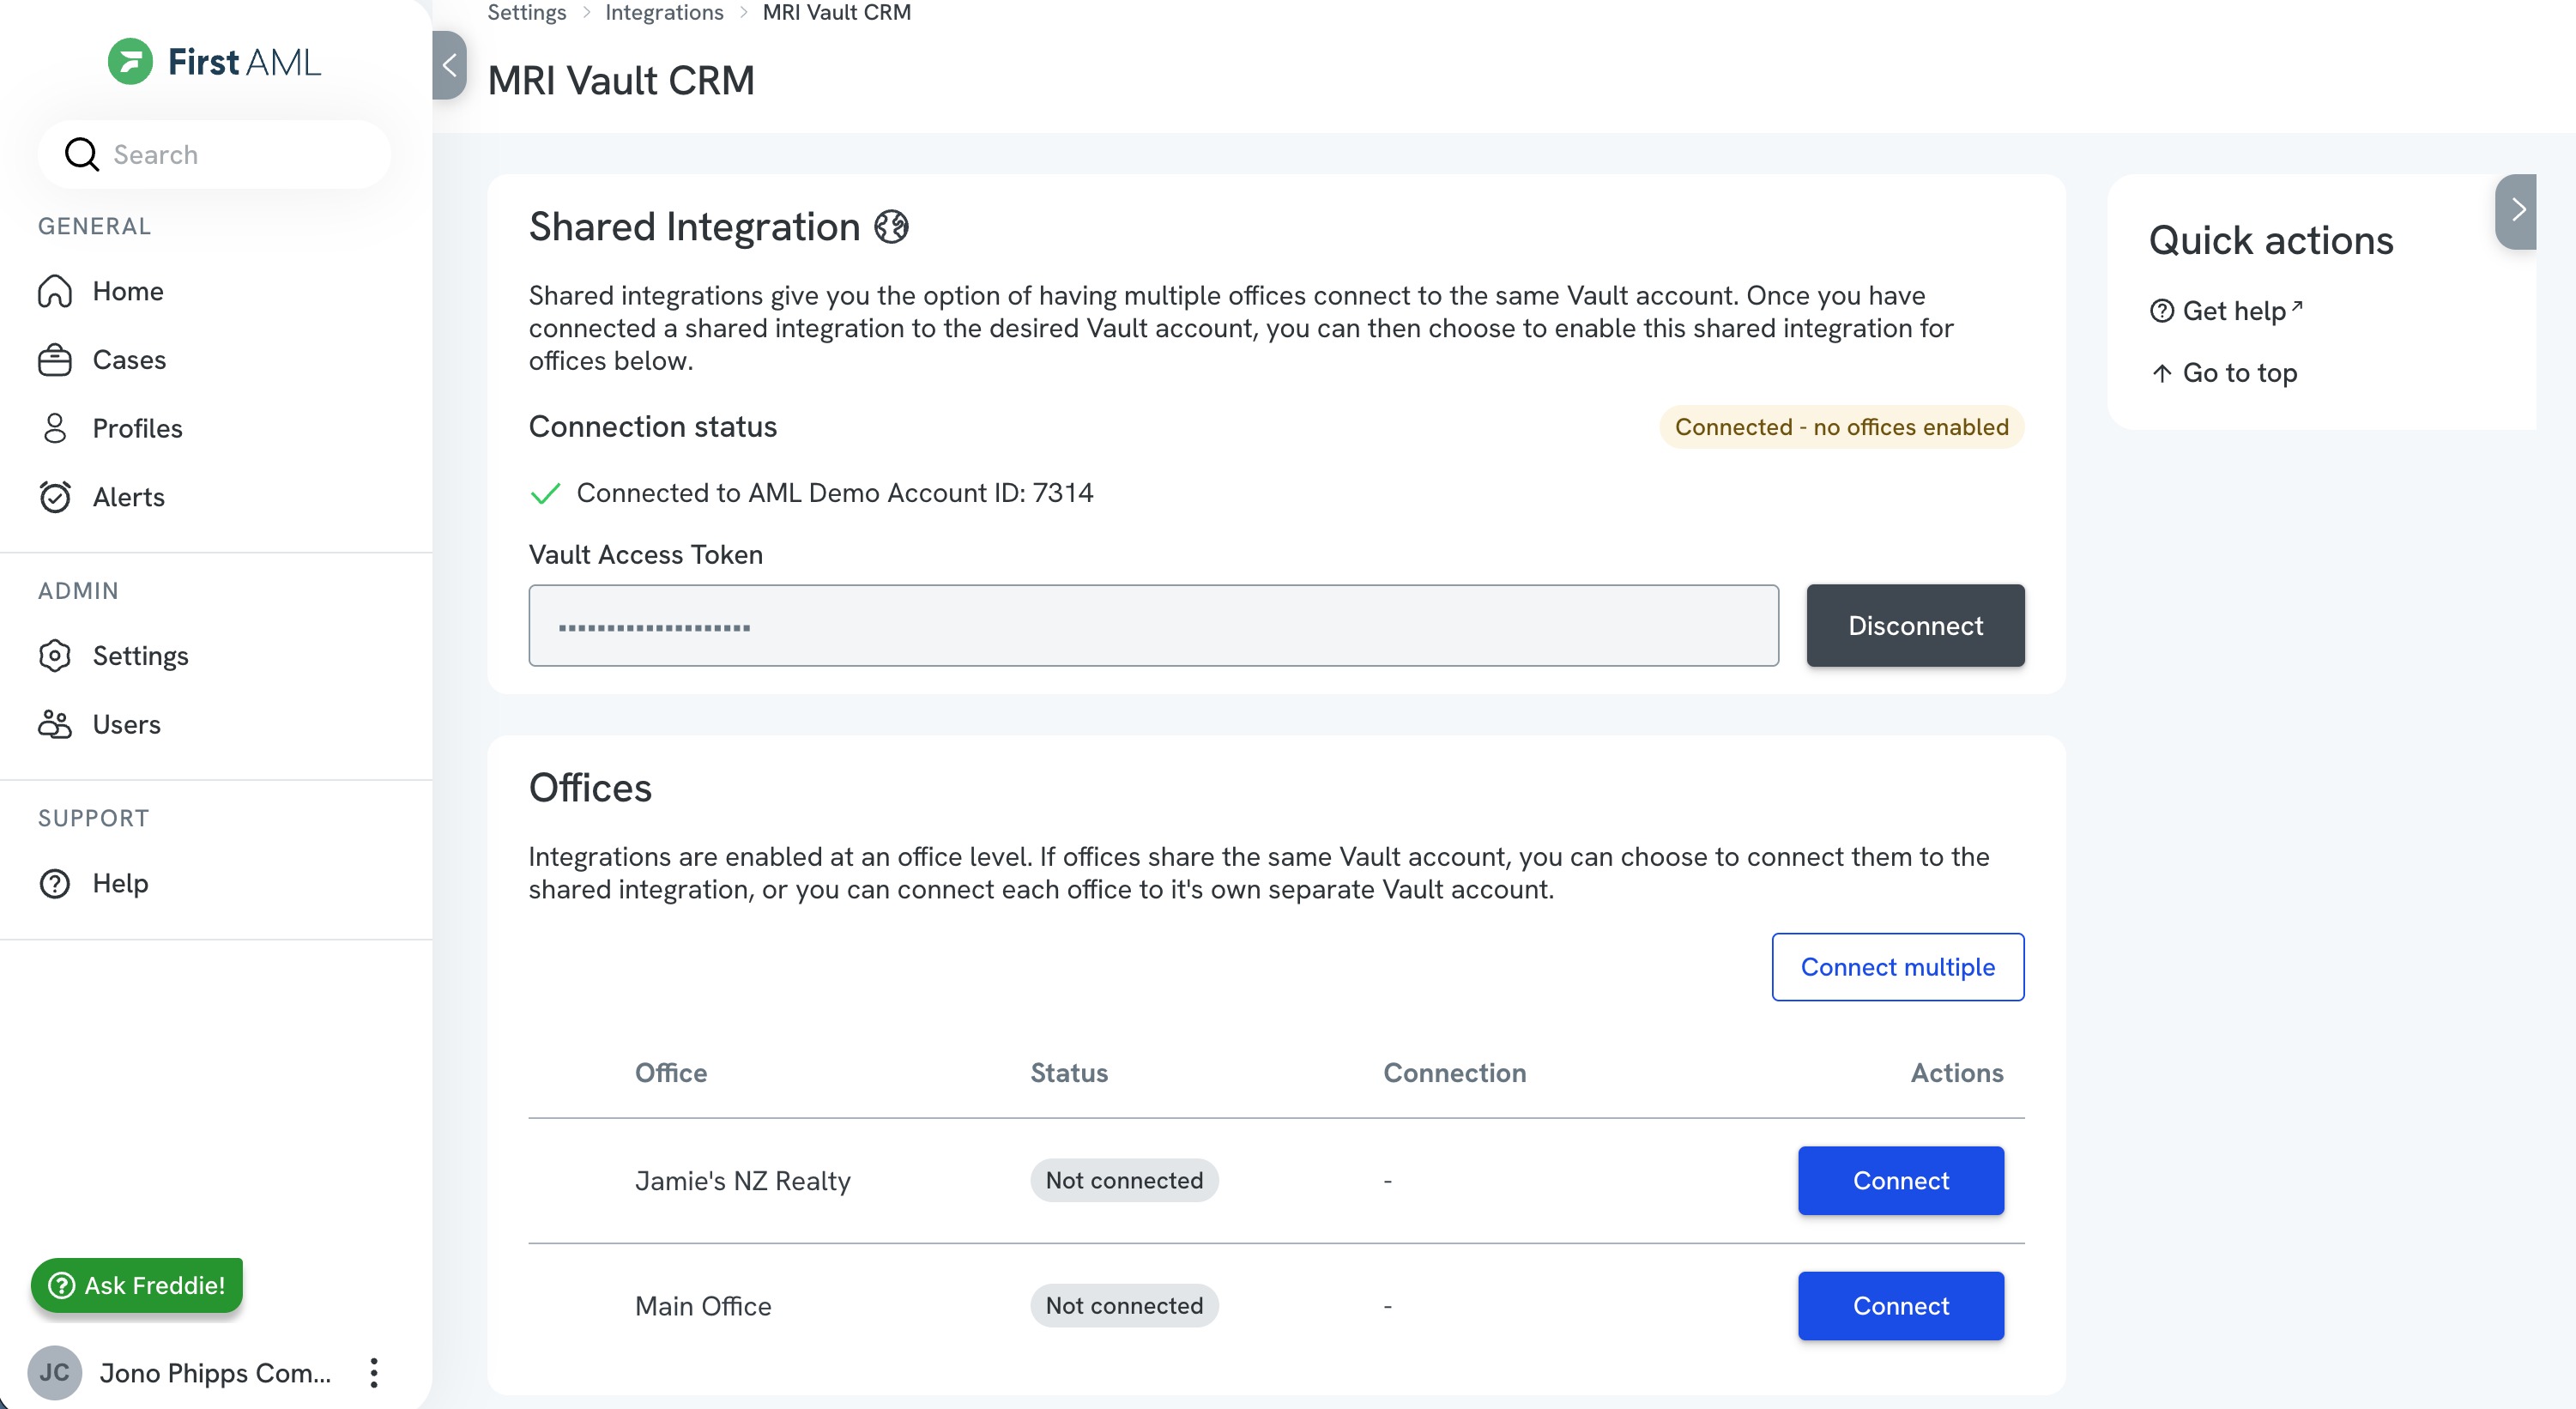
- In the "Shared Integration" section, paste in the Vault Access Token you just created and select "Connect".
- Your Shared Integration now shows as connected, but no offices are enabled to use it yet. In the "Offices" section below, select "Connect multiple" to choose all the offices that should connect to this Vault account.
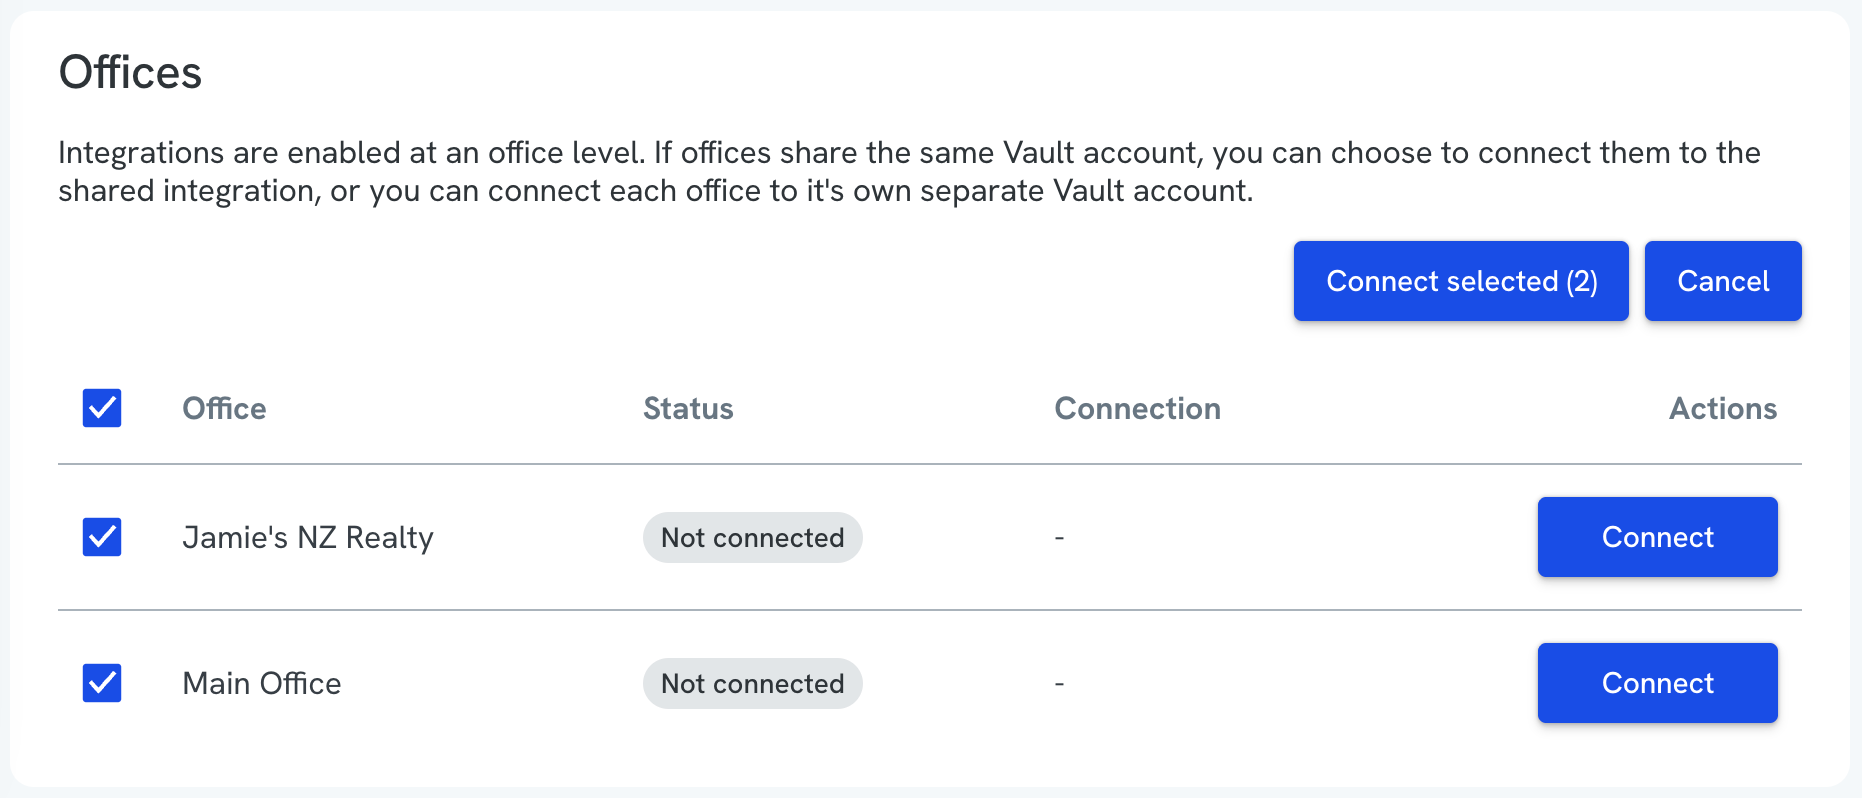
- You can also select "Connect" for individual offices, then select "Connect this office to the shared integration" to enable it.
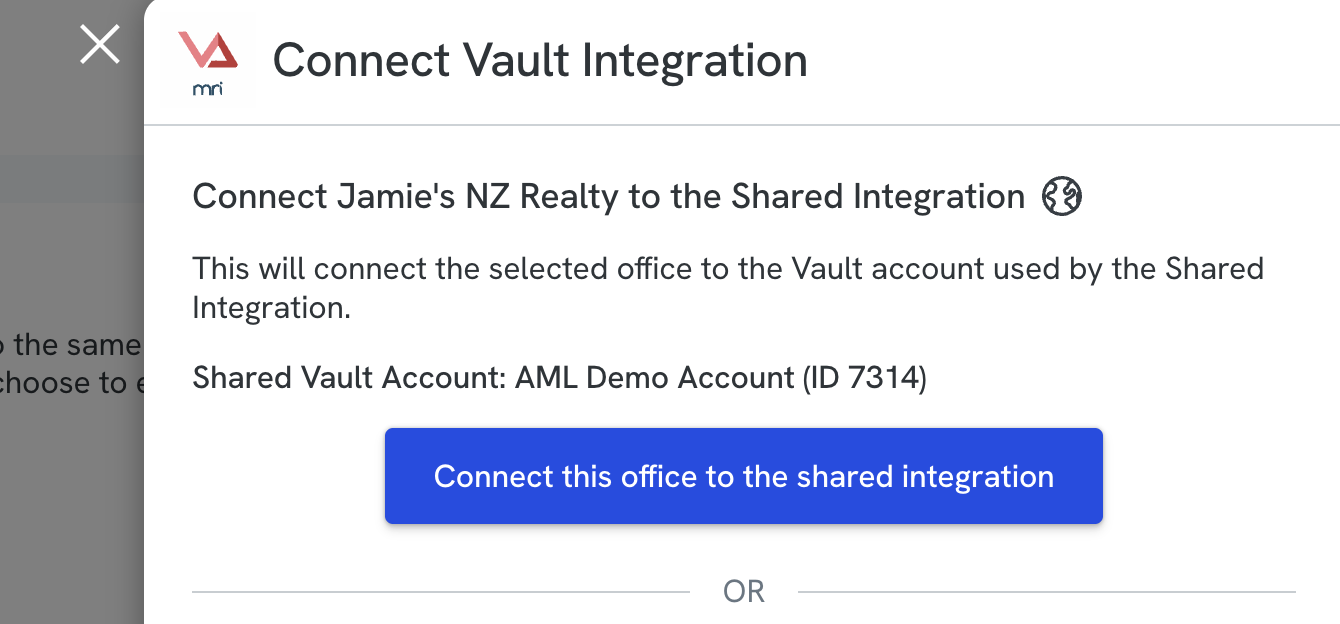
Tip: if you already have a shared integration set up but have a second group of offices you want to connect to a second shared Vault account, you can still connect multiple offices to that Vault Access Token manually by following the steps below.
2. If you want to connect an individual office to its own Vault account
- Create your Vault Access Token in the desired Vault account, following the steps above.
- As a Compliance Admin, select "Settings" in the left-side menu, then go to "Integrations" > "Vault".
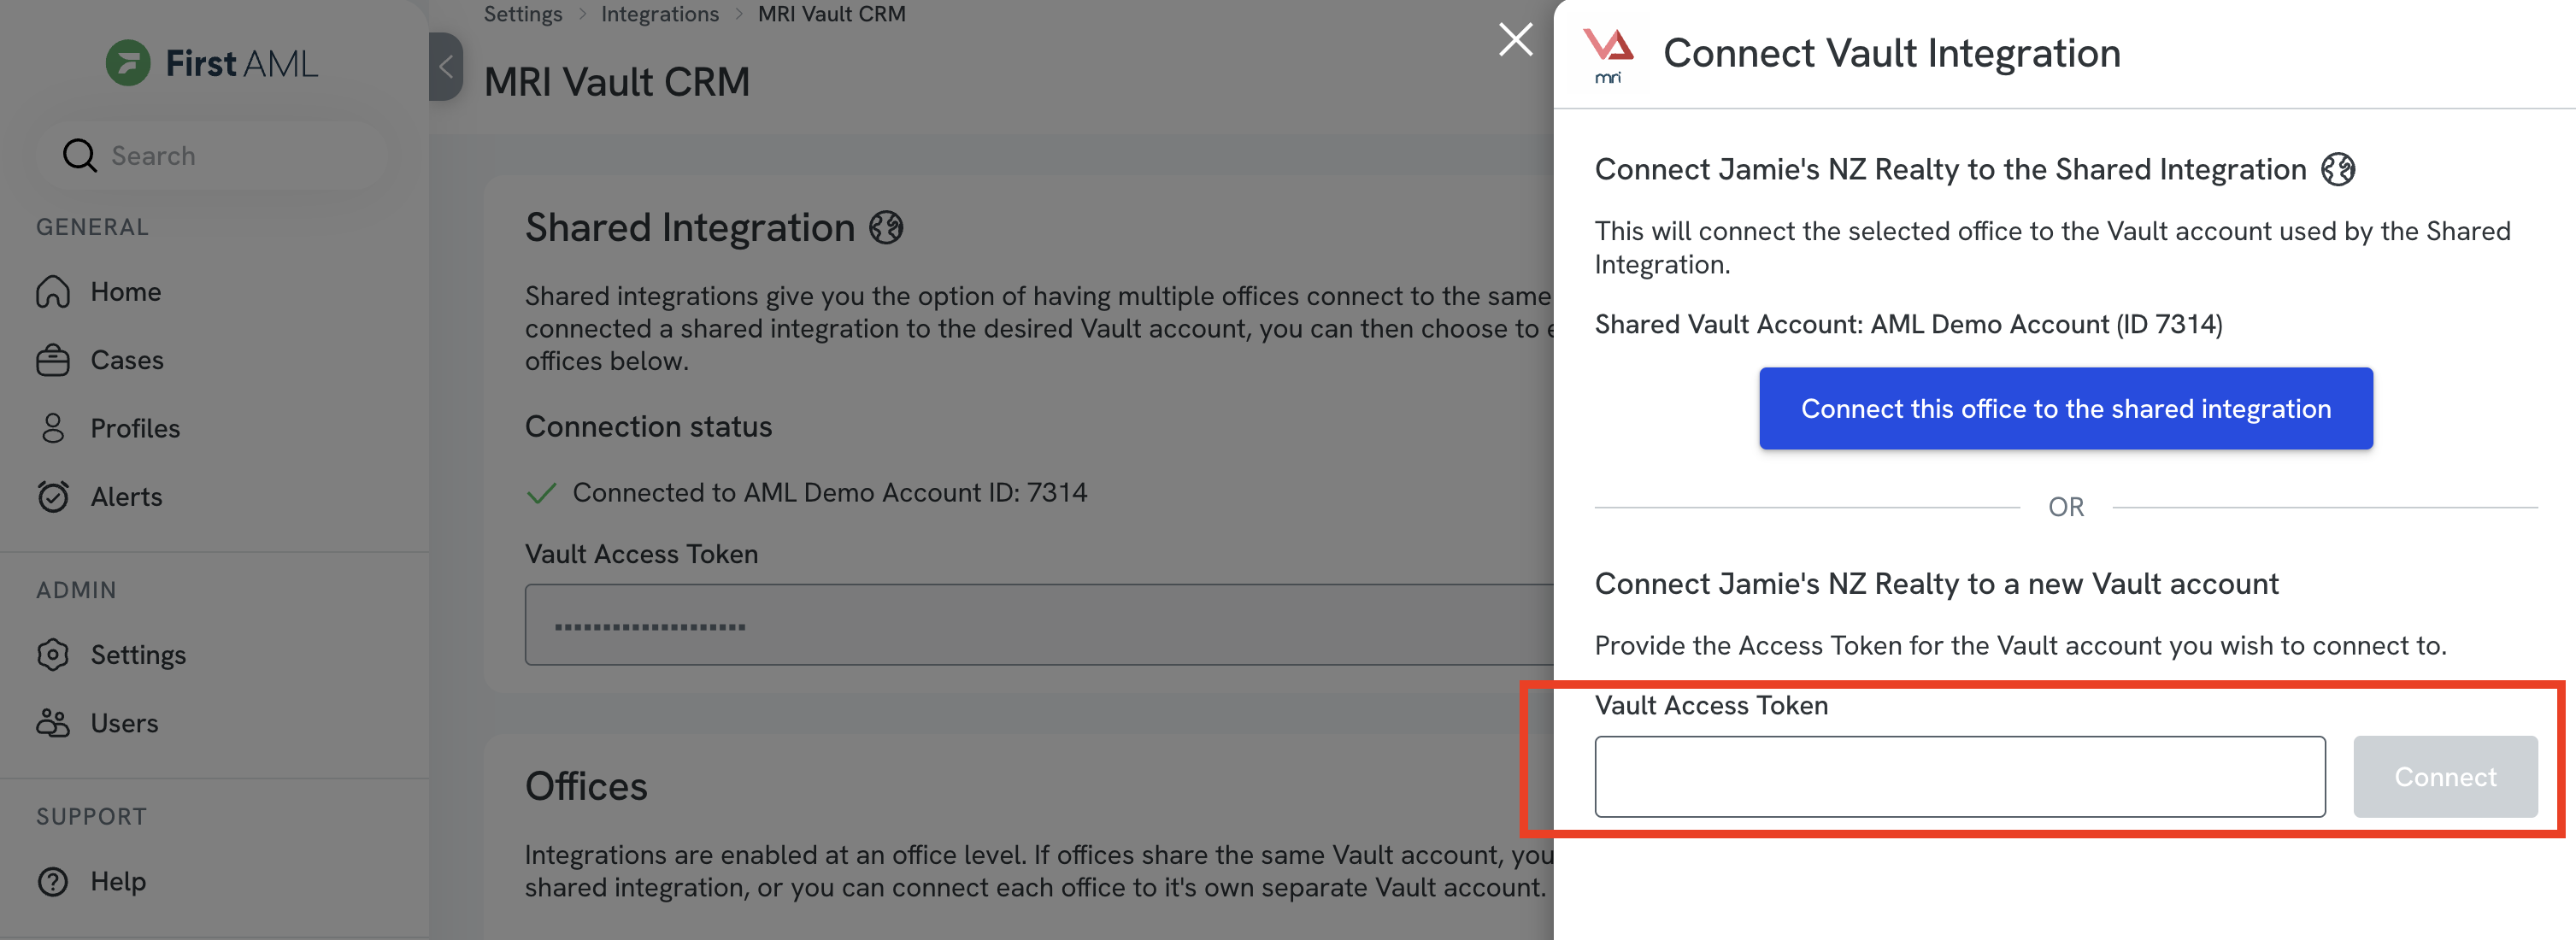
- In the "Offices" section, select "Connect" for the office you want to integrate with this Vault account.
- Paste in the Vault Access Token specific to this office and select "Connect".
Understanding how your offices are connected
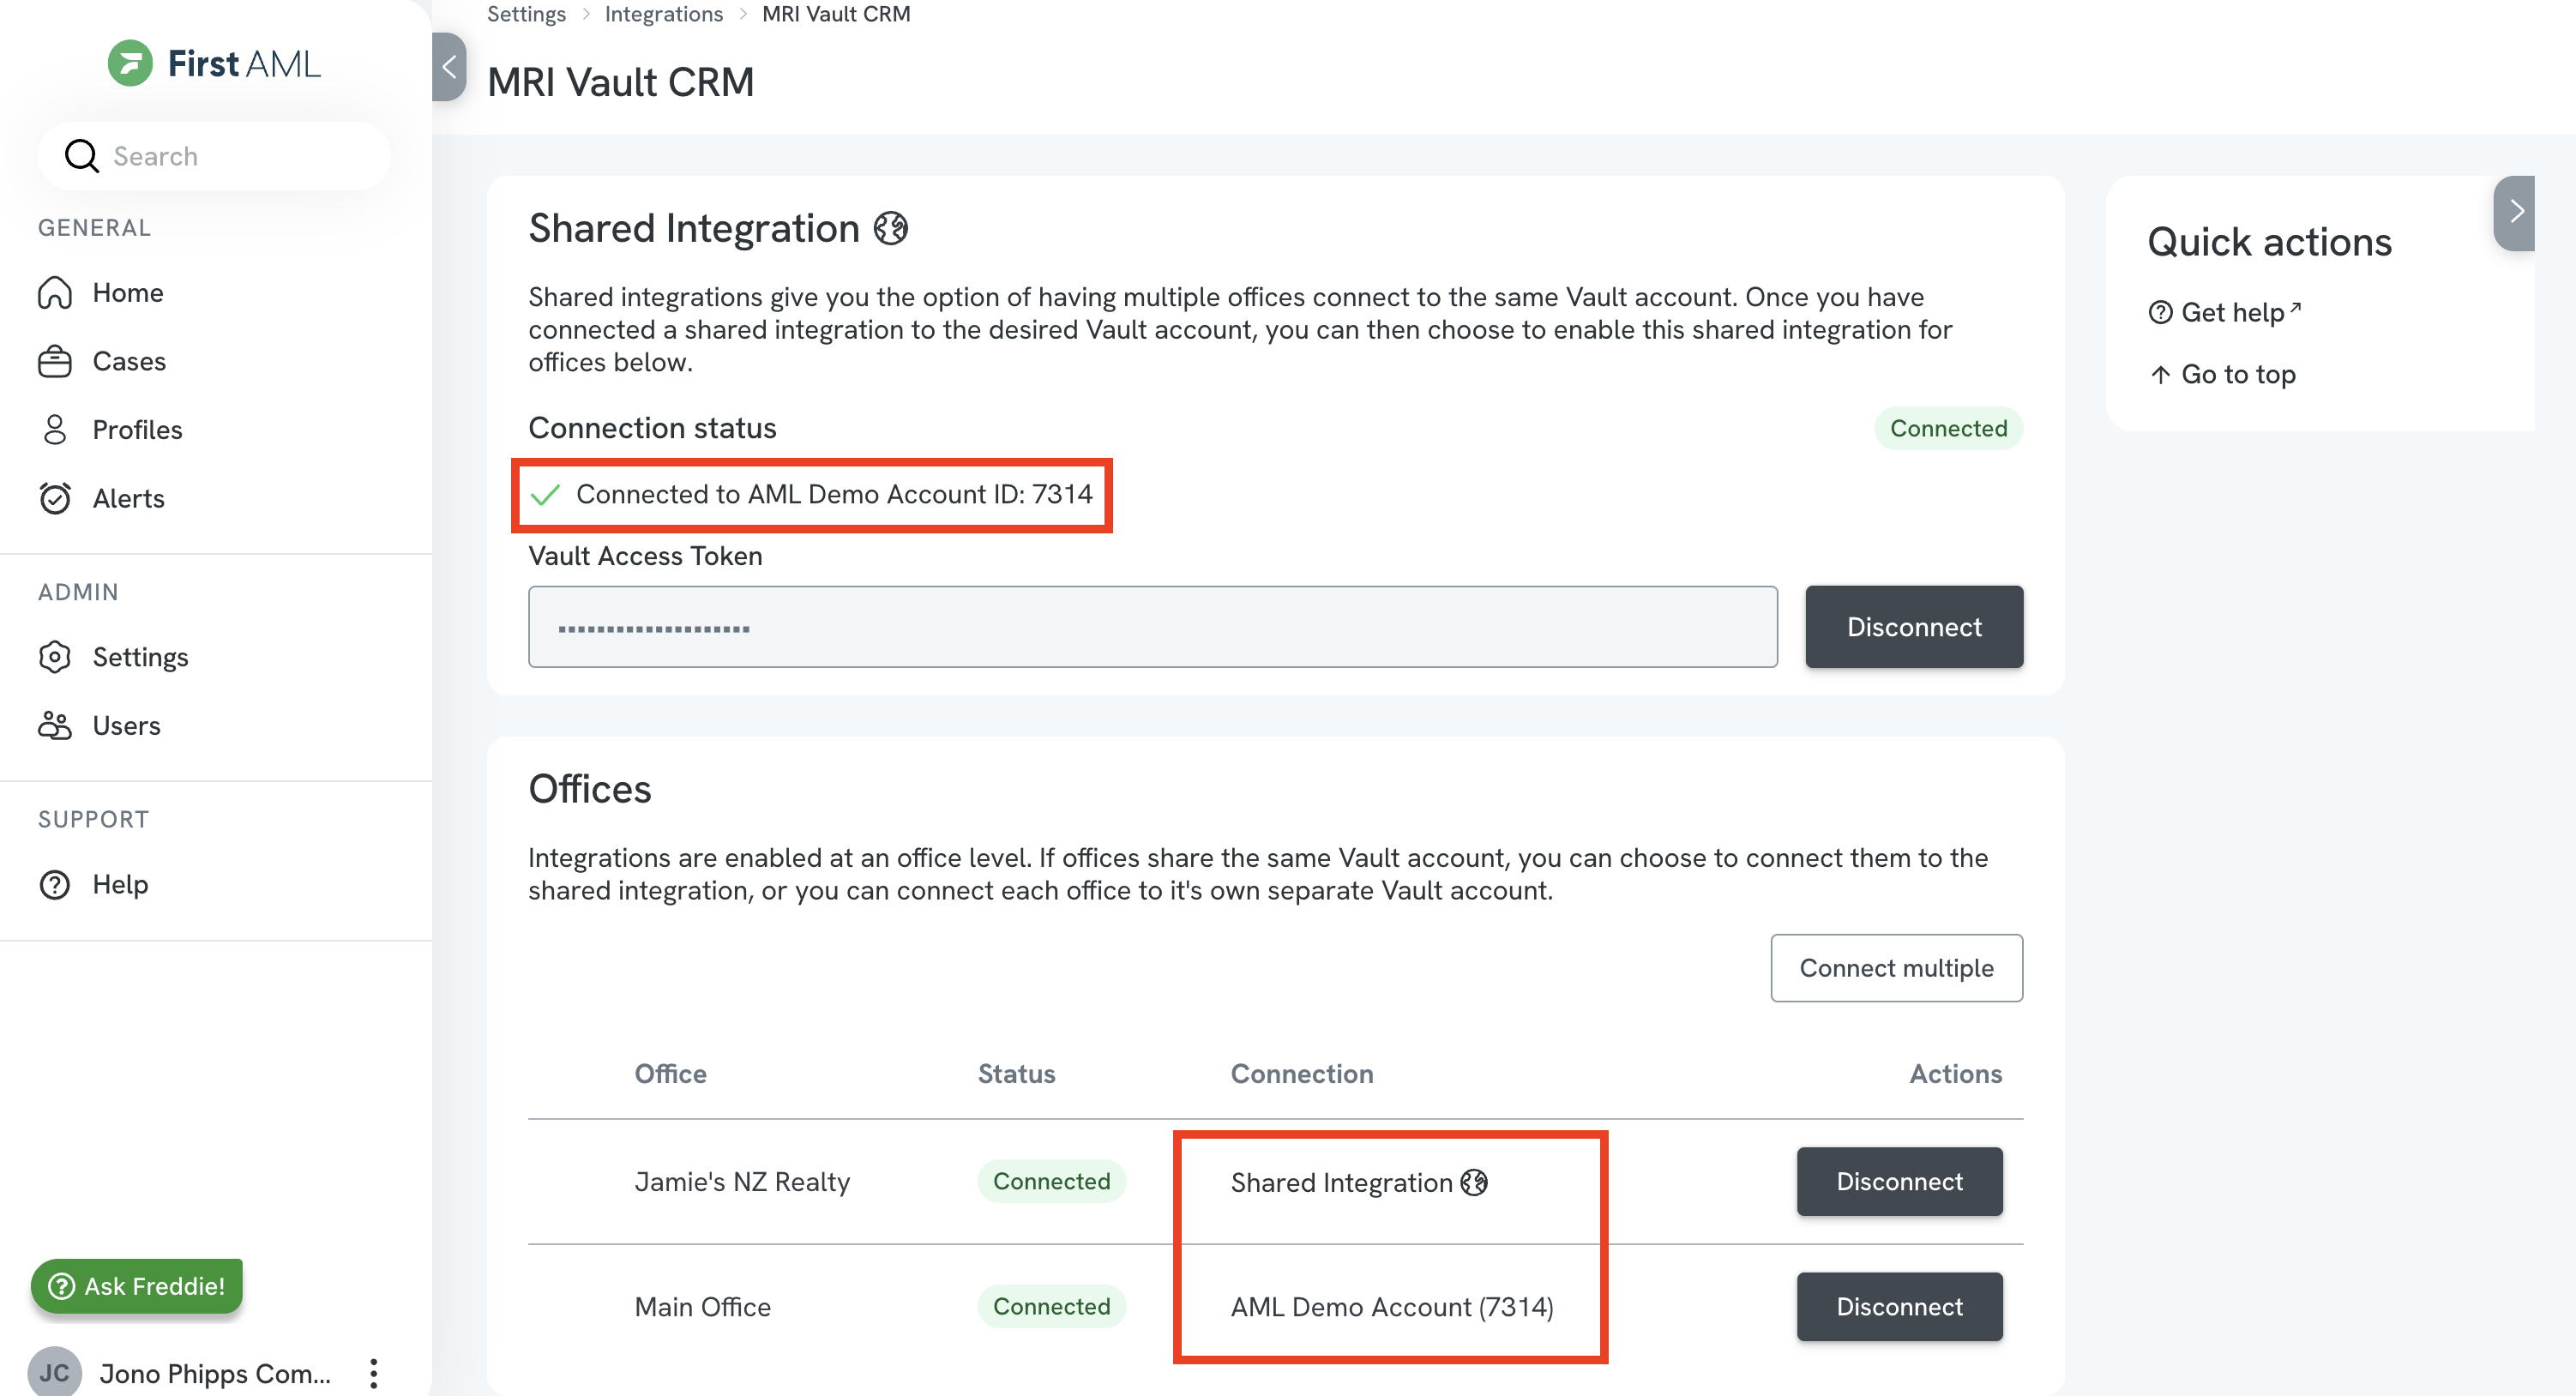
The "Connection" column in the Offices section shows which Vault account name and account ID each office is connected to.
If an office is connected to the Shared Integration, the account name and account ID being used are shown underneath the Shared Integration connection status.
Enforcing use of the integration
You may want certain roles (such as Agent Office) to only ever create a case if it is integrated with a Vault property.
To do this:
- Navigate to the Enforcement tab.
- Select the roles that must only create cases that are integrated with Vault.
- Save.
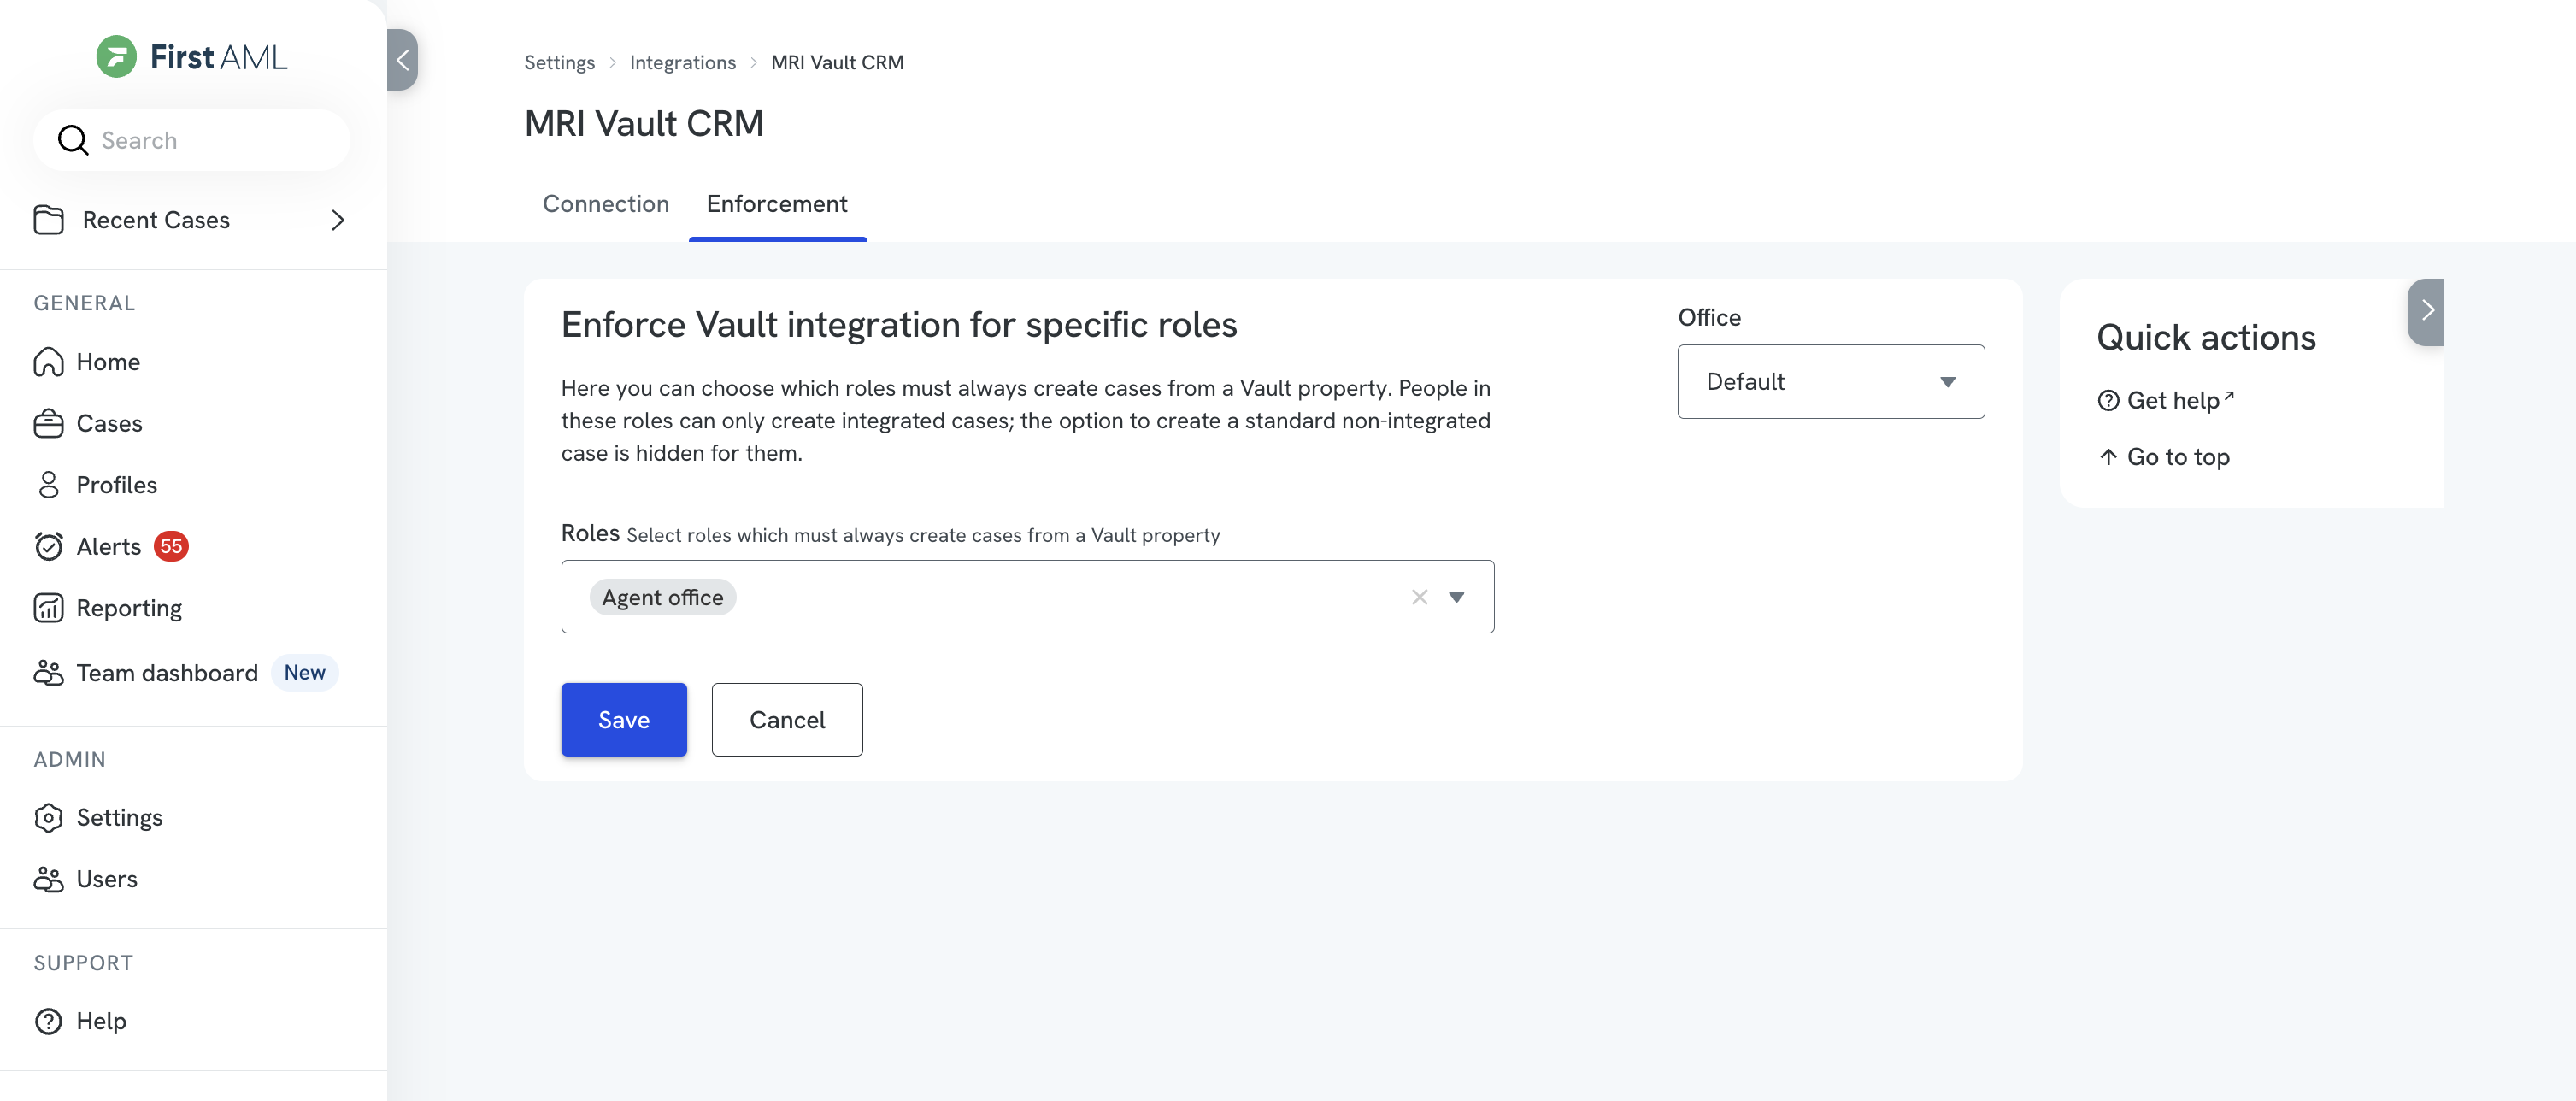
The selected users will now be forced to select a Vault property when creating a case, and will not be able to create a case manually if that property does not exist in Vault.
How it works
Creating a case in First AML
- The property must already exist in Vault, and the sellers or buyers you want to verify must be associated with that property.
- Create a new case and select the relevant office.
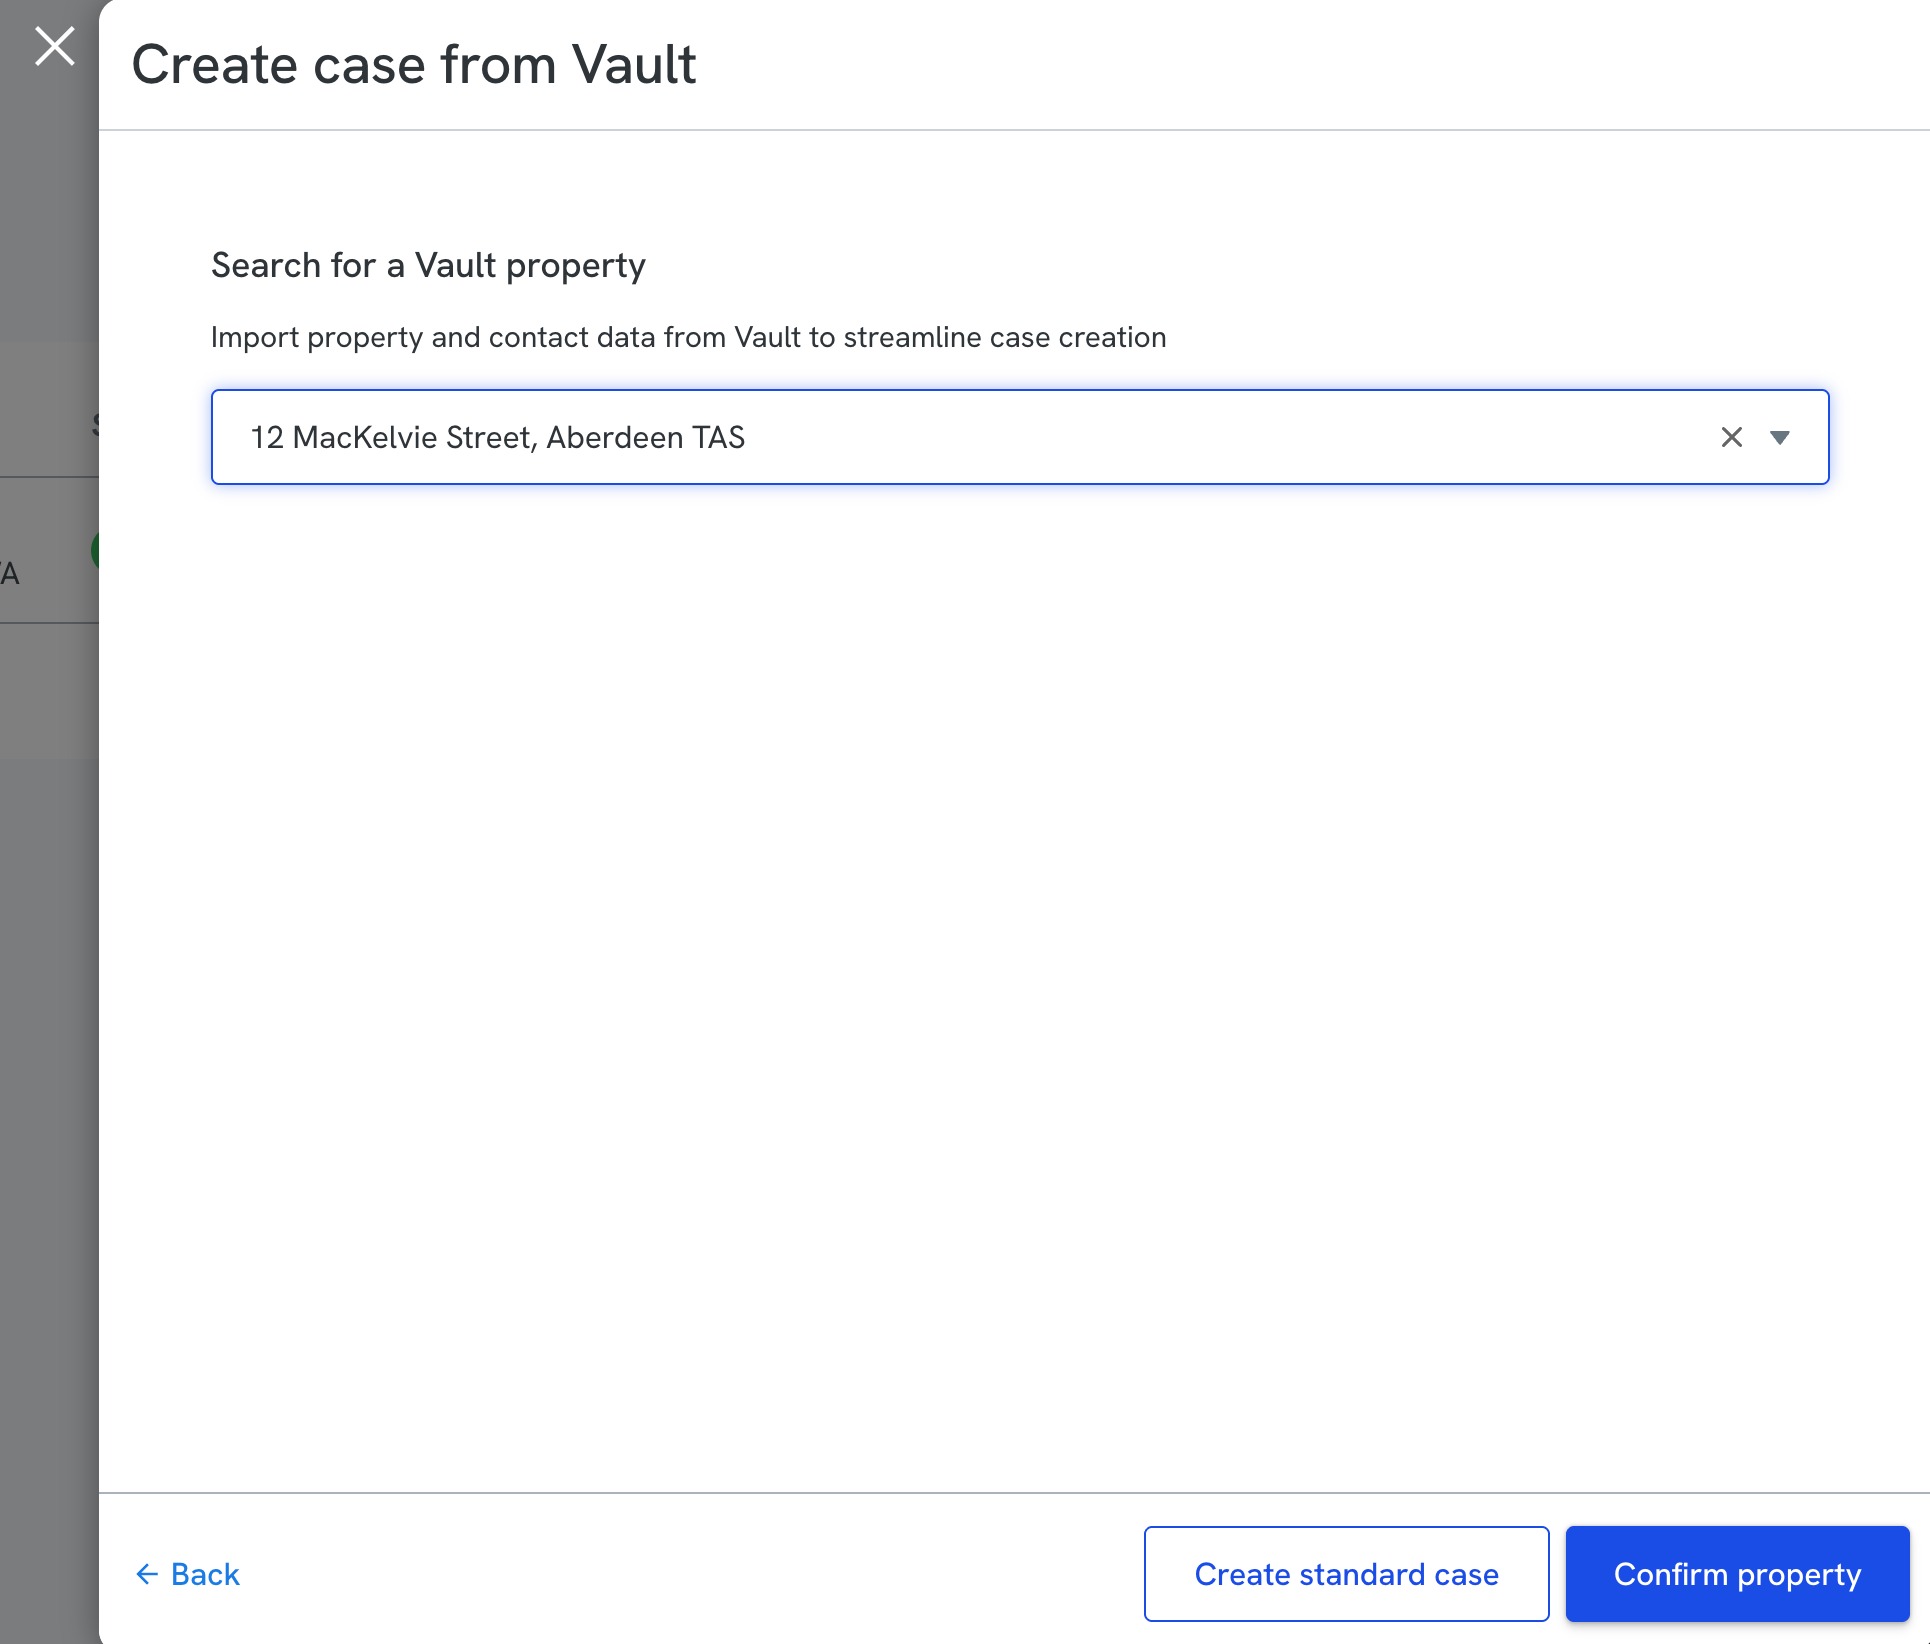
- Search for and select the Vault property, then select "Confirm property". The property address and any associated sellers and buyers are pulled in from Vault automatically.
- If both sellers and buyers are associated with the property, confirm whether the case relates to the seller or buyer, then select the Vault contacts that require verification.
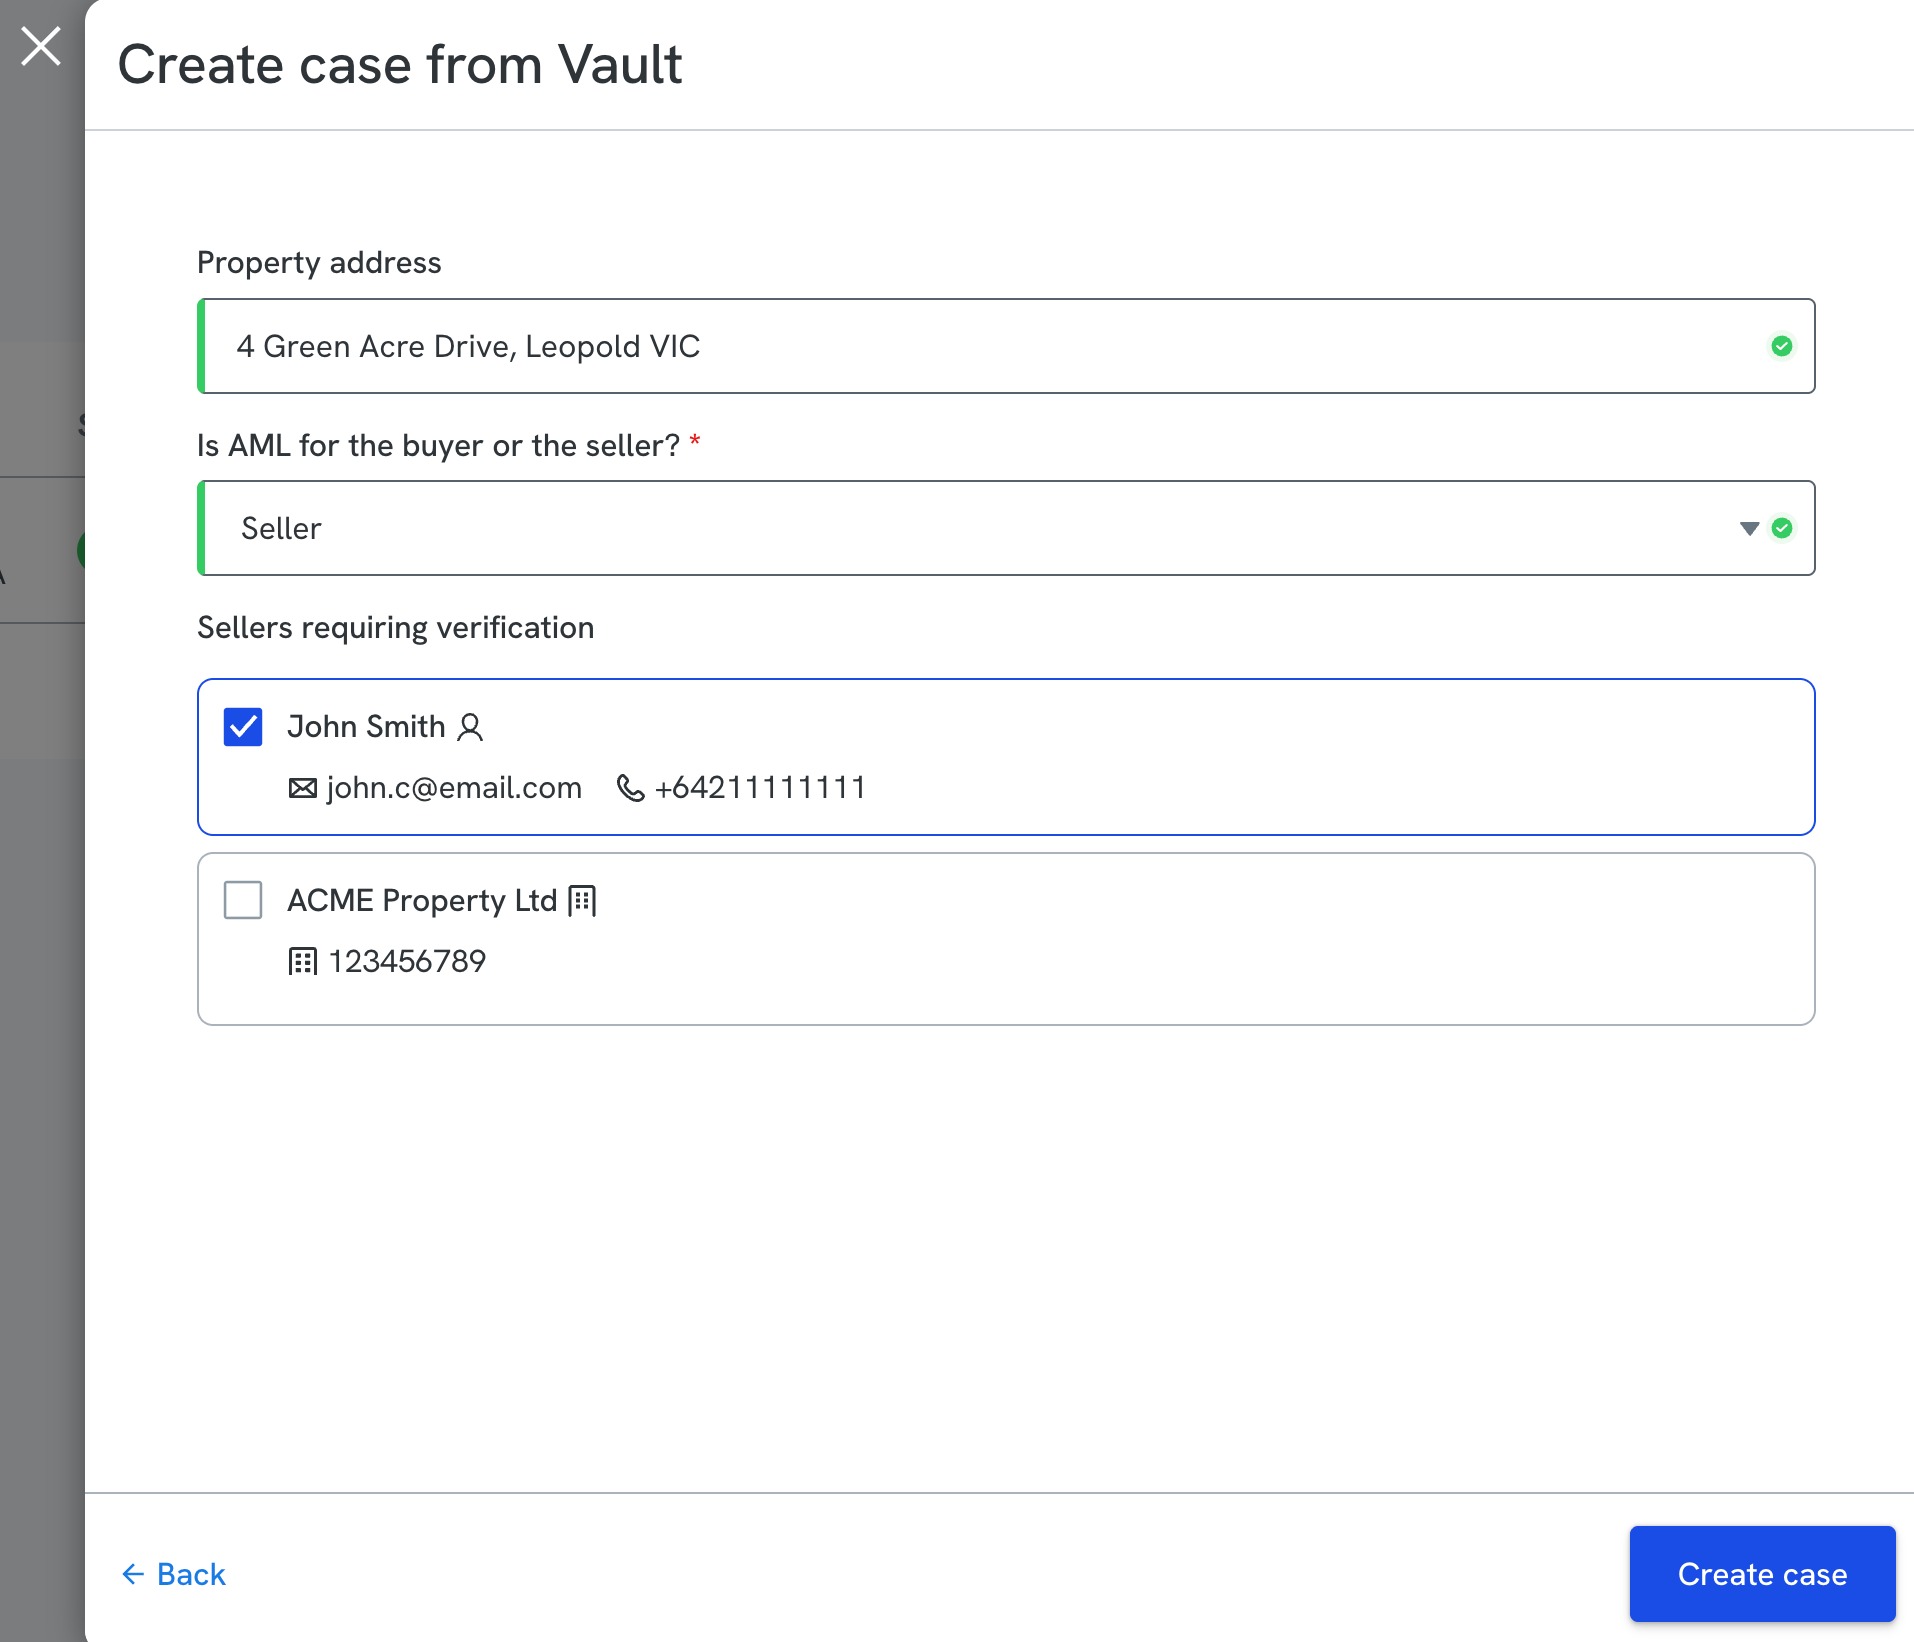
- When you create the case, the integration automatically creates an In Progress AML check in Vault for each contact you selected. First AML retains key Vault reference information, and you can link from a case or profile back to the associated Vault record.
- Once the AML case is completed, Vault AML check statuses update automatically with the verification results.
- On an ongoing basis, whenever we recognise a returning contact from Vault, we retrieve them into the First AML case automatically. The user can see that contact's last verification result if they have permission to view that data.
Note: if you have multiple offices, our retrieval rules respect your Profile Sharing Policy. This is the setting that controls whether a profile created in one office can be seen and reused by another. Profiles will not be retrieved automatically if they sit in an office with a "No Access" sharing policy.
Troubleshooting - No contacts after confirming a property
What you will see
When you search for and select a Vault property and then select "Confirm property", the property address and any associated sellers and buyers are pulled in from Vault automatically. Sometimes the contact list comes back empty.
Why it happens
An empty contact list almost always points to the Vault side of the integration rather than First AML. It usually means one of the following:
No contacts are attached to the property in Vault.
A duplicate property card has been selected, and the card you picked has no contacts attached to it.
Duplicate property cards are a common cause. When the same property exists more than once in Vault, it is easy to select the copy that has no sellers or buyers linked to it.
What to do
If the contact list is empty, stop before you add anyone. Do not add the sellers or buyers manually to get past this step.
Contacts added manually are not linked to Vault. With no Vault contact link:
No AML checks are created in Vault for those contacts.
The Completed status will not sync back to Vault when the case is finished.
Instead:
Pause the case and open the property in Vault.
Check that contacts are attached, and that you are viewing the correct property card if more than one exists.
Where duplicate property cards exist, remove the redundant card or mark it clearly so the correct card is used next time.
Return to First AML and create the case from the property that has the contacts attached. The sellers and buyers will pull through at "Confirm property", and the integration can create the AML checks and sync the Completed status as normal.
Important process note
Vault only allows a single In Progress AML check to be open for a contact at any time. Once a check is In Progress, another cannot be created until it is manually approved or rejected.
For this reason, your team should not manually start AML checks from within the AML Overview tab in Vault. Let First AML create them automatically when a case is created; starting one manually in Vault will block First AML from creating its own check for that contact until the manual one is resolved.