TABLE OF CONTENTS
The First AML Platform offers different user roles to provide flexibility and control over access and permissions. User roles determine the level of functionality and access each user has within the platform.
For organisations with multiple offices/teams, "offices" can be created in the platform. With this feature, you can control the visibility of cases to specific staff, ensuring that staff members can only view cases associated with their respective offices.
This article provides an overview of each user role and their respective permissions, whether your organisation has "offices" set up or not. If you have any further questions or need assistance, please reach out to your Onboarding Specialist or our Support Team.
Office-Based Roles
Please ensure the offices are created in the platform prior to adding users.
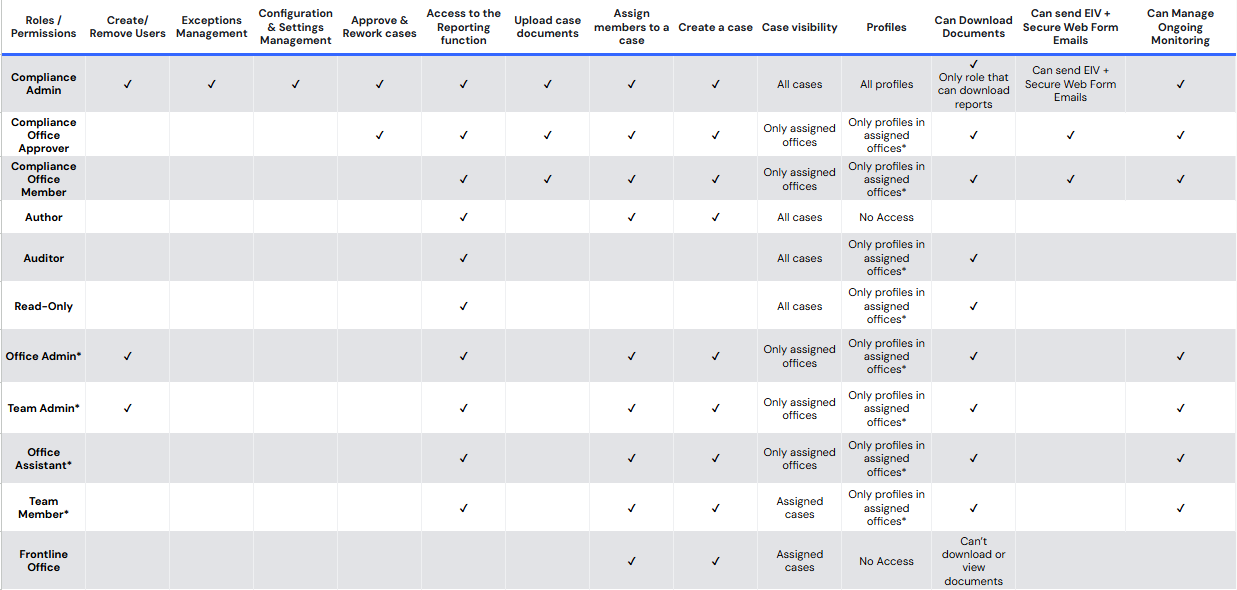
If your account is set as an ‘Office-based’ account, when creating a user, you will see the following role options:
Recommended Roles:
Compliance Admin
- Compliance Office Approver
- Compliance Office Member
- Frontline
Roles and permissions:
Click on the table below to open a bigger version of this image.
Please note the following roles are not for Real Estate and the ‘Admins' cannot assign compliance roles:
- Office Admin
- Team Admin
- Office Assistant
- Team Member
Additionally, the Author user role is the only user role that can create 'Draft' cases. For further information on the 'Draft' case status, please click here: Case status.

*Profile access can be set to limited access which means user roles with this * will be able to see limited information based on office privacy settings.
Non-Office-Based Roles
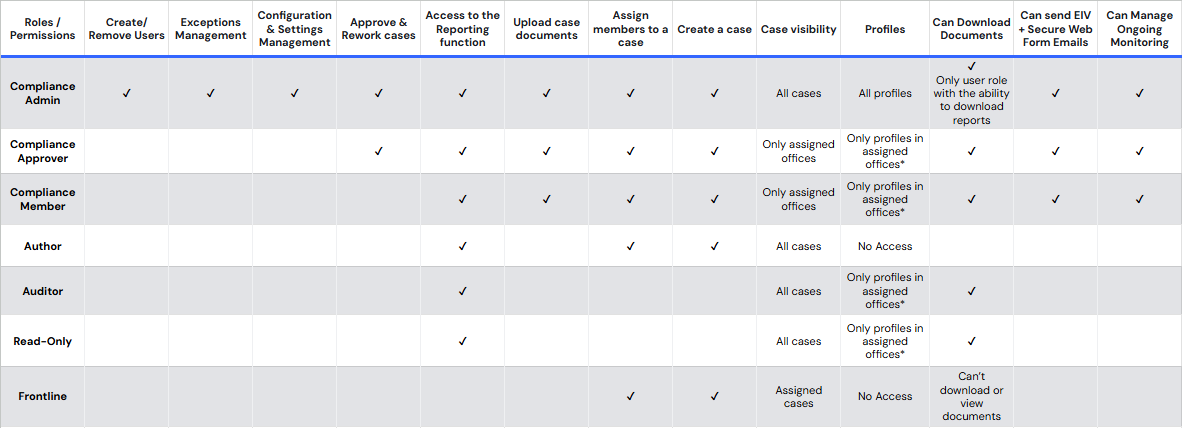
If your account is set as a Non-Office-Based’ account, when creating a user, you will see the following role options:
Recommended Roles:
Compliance Admin
- Compliance Approver
- Compliance Member
- Frontline
Roles and permissions:
Click on the table below to open a bigger version of this image.

Additionally, the Author user roles is the only user role that can create 'Draft' cases. For further information on the 'Draft' case status, please click here: Case status.
*Profile access can be set to limited access which means user roles with this * will be able to see limited information based on office privacy settings.
How to Edit User Roles
To edit user roles, you must have a user management capable role in the above tables.
Step 1: Click on the ‘Users’ Tab on the left navigation bar
Step 2: Click on the Grey Pencil on the right of the user details
Step 3: Click on the ‘Role’ field to drop down the options and select the role
Step 4: Click ‘Save user’
